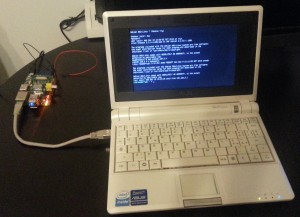
I’m currently working on a Raspberry Pi based fake bomb for some games with my airsoft team and I wondered “what if the bomb suddenly stop working while I’m kilometers away from my home?”. I surely need a setup for debugging it while I’m in the wilderness. The use case is not limited to mine’s, there are a number of others case that could benefit from this: Any headless Raspberry Pi that can’t reach your router/switch via an ethernet cable or any access point + web interface configuration (radio controlled vehicles, carpc setups, automation) where wifi-dongle suddenly stopped.
Important note: This is not a full step-by-step guide. I will skip some steps you can find plenty guides on google and I’m assuming you are a little comfortable with working with linux and its command line.
I still had my EEEPC 701 (also know as 4G) lying around and I had no use for it due to its specs, which are similar to PI and far worse than any modern tablet. The battery still lasts for more than an hour so it is great for what I’m doing.
At a glance this is what we are achieving here:
Raspberry Pi ETH < – > ETH Netbook WIFI < – > Your connection of choice (wifi router while in home, mobile tethering while out)
This setup, with proper configuration, will allow you to SSH into your PI and have Internet access on both PI and Netbook.
ETH < – > ETH connection could be substituted by a Serial RS232 < – > USB using a proper adapter. I currently didn’t test this and this guide will not explain how.
Let’s start.
Requirements
Any kind of netbook with both an ethernet and a wifi card, 1-4GB of disk space depending on what distro you use.
Your Raspberry eth0 interface must be configured with allow-hotplug stanza, Raspbian come with this configuration by default.
NetBook preparation
Install your favorite linux distro on your netbook, in my specific case I installed Debian Wheezy on a SD card. There are a tons of guides about installing linux on your pc, so I will skip the explanation of this step and assume you have already installed a Debian-Like distro (eg. Ubuntu).
If you are using a crap pc like mine’s, I strongy recommend to NOT install an heavy desktop environment (Gnome, KDE) or better to not install a desktop environment at all. You will save a lot of space and a bunch of seconds on boot.
Note: most of the command listed here, like restarting services or editing configuration files in /etc folder will require a root login (or using sudo before each command).
After powering our system up and running and logging as root use command:
ifconfig -a
This will give us a list of devices, we should have an eth0 interface and a wlan0 interface. If numbers are different take note and edit configuration files accordingly.
First off we want to connect our wlan card to our access point. If you are using a properly protected connection (eg. WPA2) install wpa_supplicant to avoid useless headaches.
Edit your /etc/network/interfaces and edit/add wlan0 configuration
allow-hotplug wlan0
iface wlan0 inet dhcp
wpa-conf /etc/wpa_supplicant.conf
Now let’s edit wpa_supplicant configuration file to work with our connection (note this work with MY connection, you may have to edit yours)
/etc/wpa_supplicant.conf
network={
    ssid="YOUR-AP-SSID"
    psk="YOUR-PASSWORD"
    proto=WPA2
    key_mgmt=WPA-PSK
    pairwise=CCMP
    group=CCMP
}
To check if everything is ok, type
service networking restart
And your wlan should be up and running.
Now that our netbook is online, it’s a good time to upgrade everything.
apt-get update && apt-get upgrade
Take your time and, once done, edit again your /etc/network/interfaces
This time we will be editing/adding eth0 configuration, assigning it a static ip.
allow-hotplug eth0
iface eth0 inet static
    address 192.168.3.1
    netmask 255.255.255.0
Make sure that address used here does not conflict with the one in your wlan network. For example my wlan is on network 192.168.0.0, so using 192.168.3.0 network on my eth0 card does not conflict. Bring the interface on with ifup eth0
Time to install a dhcp server to serve IPs on eth0 interface, so when we connect our Rapsberry PI it automatically get its IP. Since I’m already using with dnsmasq on my linux dhcp server, I will use it again here. Install it and edit its configuration file.
/etc/dnsmasq.conf
domain=example.com
no-hosts
min-port = 4096
server = 8.8.8.8
server = 8.8.4.4
cache-size = 1000
dhcp-range = 192.168.3.2 , 192.168.3.10 , 255.255.255.0, 1440m
dhcp-option = 3, 192.168.3.1
dhcp-authoritative
interface=eth0
Use service dnsmasq restart to enable it.
If you connect your NetBook and your RPi ethernet cards, dnsmasq will take care of giving your Raspberry PI an IP. You can use command cat /var/lib/misc/dnsmasq.leases to see that IP.
But right now your Raspberry does not have internet access, we must set up NAT.
Edit your /etc/sysctl.conf
and add the line net.ipv4.ip_forward=1
to enable ip forwardarding on boot, then run the command
sh -c "echo 1 > /proc/sys/net/ipv4/ip_forward"
to enable it without rebooting.
Run those three lines to add the needed forwarding rules
iptables -t nat -A POSTROUTING -o wlan0 -j MASQUERADE
iptables -A FORWARD -i wlan0 -o eth0 -m state --state RELATED,ESTABLISHED -j ACCEPT
iptables -A FORWARD -i eth0 -o wlan0 -j ACCEPT
Save the NAT configuration running the command
sh -c "iptables-save > /etc/iptables.ipv4.nat"
Then edit again your
/etc/network/interfaces
and add the line
up iptables-restore < /etc/iptables.ipv4.nat
and we're done.
Faqs
Q: Do I need a crossover cable?
A: Nineties are gone. Most (if not all) NICs from the last 10 years will work out of the box with regular cables.
Q: Can I power PI from netbook's USB?
A: No, you can't.
