Categories
3D Printing Nerding PC Nerding

Power Of The Power Of The Power (Of The AI)

Title citation is for connoisseurs.

While my last post about AI was a little too much sarcastic and apocalyptical, the previous one was entirely about AI art, which is something I find really really amuusing. The second “u” is not a typo 😉 .
The power of these generative AI is absolutely astounding and the open source community is amazing, relentlessly developing new stuff, training new datasets, moving way faster than I can keep up.

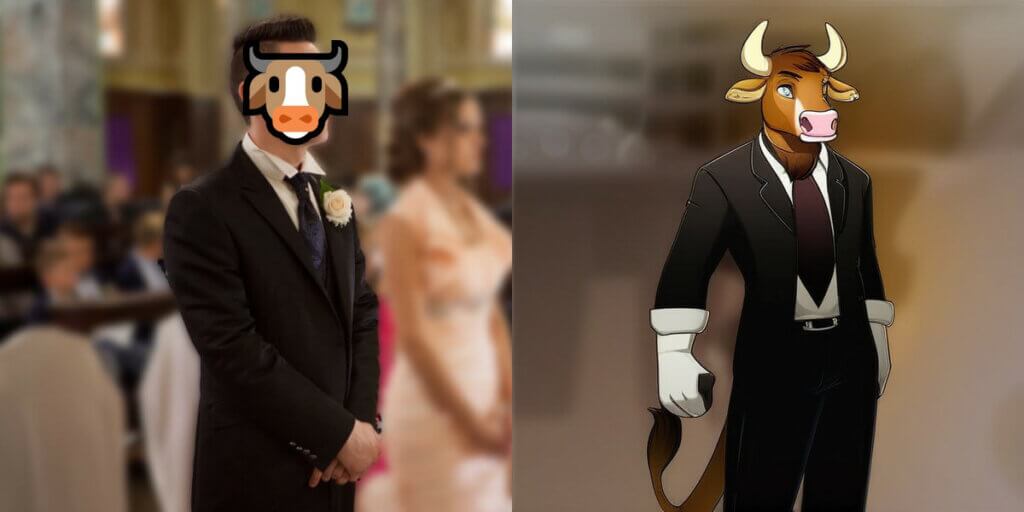
One amazing dude was into MLP and Furry stuff and made the best checkpoint for animal stuff. For people who know me since always, “Muu?” comes from my Diablo 2 time and it’s not meant as a furry related nick, but let’s be real, furries are ten steps ahead when it comes to anthropomorphic cows and bulls. In a few clicks you could make a good looking full avatar, see for yourself:

Remixed one pic from my wedding using Stable Diffusion, img2img and PonyDiffusion as checkpoint.
muu_avatar_sprite_matrix
Here I tried making a Cow/Bull squared avatar, these are all the images I got with no filtering at all, minus a couple that made absolutely no sense. You can see for yourself that you without a specific style you get all grades of human <-> animal and a various grades of sfw <-> nsfw.

I have the luck to have a nick that overlaps with furries, but I bet you can find a checkpoint good at robots, anime, space, whatever you like

In the older post update I told you about Dreambooth training, now training goes through a technique called LoRA, which is beyond the scope of this post. Oh, to tell the truth this post has no scope at all, it’s one of my ramblings. What I really wanted to share was this pic:

Toy of myself

It’s a year old generation of myself, when I trained the older Stable Diffusion checkpoint with my pics using Dreambooth. It’s me, as an action figure, dressed like my wedding. The reason I used my wedding pics is because they were professionally taken, super high quality, I didn’t have grey hair and I was 20kg less. In this order I swear.

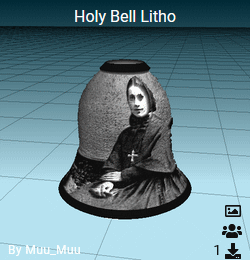
What I found amazing is that right now I could have a 3D model of this overall bad quality pic (512x512px) and have it in less than a minute.

I used a model called One-2-3-45++, there’s a demo hosted by the devs on Sudo.ai with some free credits, I was able to generate this glb model:

The model is not super high definition (2000 faces/verts), but it can be converted to stl using any 3d editor like Blender and 3D printed on home printers.

Now, if there only was an affordable way to 3D print in full color…

Categories
3D Printing Nerding

Learn how to make more cool Christmas lithophanes

Clickbaity title, isn’t it? This year, and this time in time for Christmas, I want to show you another great lithophane generator. A couple years ago I posted Make your own Christmas Lithophane decoration about making spherical lithophanes you could hang on your Christmas tree. In accordance with EU laws to avoid any kind of personal data handling I don’t track users at all and I don’t keep any kind of metric, but it’s my most commented post so far, so I guess people like and make these a lot.

Now let’s cut the small useless talk and get to the point: Go to itslitho.com to see the new lithophane generator I’m talking about. It’s more feature-complete than the one I used in the earlier post, keep in mind this does not mean “it’s better”, for some people the other one is simpler and easier to use. This time I won’t be explaining every single feature of this editor, it has too many for lazy Muu? to show you. As you will see from the screenshot below, it does feature a preview window

itlitho screenshot
You can actually preview the model as you edit it!

It’s Litho profile examples

What I’m showing you today is a bunch of examples, one using led tealights, one using the old Christmas ball decoration led and one that can use both lights. The best part of this site is that allows you to save and share profiles, you can see in this preview what my creations look like and access the relative profile directly by clicking on it.

Image formats and lithophane lights

Regarding image format, for the first two profiles I kept the same 4:1 ratio reusing my previous dog photo collage, while for the Holy Bell I made a new 2:1 image with my town’s Basilica (Church) Patron Saints Antonio Abate and Francesca Saverio Cabrini. More details on them on Wikipedia (in Italian) if you actually care.

The led candle lithophane uses these candles, the Christmas tree lithophanes use these shitty small led lights (the same 1-hour LEDs we used in Make your own Christmas Lithophane decoration, if you bought a 30 pack like me and have a surplus), the Holy Bell one can actually use both, making for a great standalone light or Christmas tree decoration.

Results

Now what kind of asshole blogger would write a 3D printing post without sharing the actual results? Here’s a small preview and a video of the flickering led candle.

I hope you like these lithophanes too!

Categories
3D Printing Nerding

3D Print Lithophane Keychains

Useless intro nobody cares about, only made to troll professional kitchen bloggers who write random useless life stuff for SEO purposes, while also improving my site SEO standing:

If you have read my last two posts, you know how much I love 3D printing custom stuff and how much I love trolling people who expect freebies. My newest creation involves a little lithophane keychain, with a photo of Mussolini and Hitler. For unaware people I’m Italian and fascism and nazism are sore points here, to the point it’s considered offensive for some people and going around displaying this kind of stuff is a sure way to get into fights. Little personal fact: My grandpa wan an Alpino during the WW2 Russian Campaign, where almost a couple thousand Italians went to die, I am lucky to be there now. But I’m an huge asshole and I love being it with entitled professionally offended people: you wanted some freebie, you get one you can’t possibly use.

Obliviously you don’t have to be an asshole 100% of the time, friends will love simple cool stuff like this and with Valentine’s Day coming up next Sunday it’s also great present for the loved ones.

Step One Lithophane creation

On this day I will show you the simple settings needed to make such a keychain, with a screenshot like the last time. This time we are using this generator from the same author.

On this page remember to select Framed Keychain Hole Top Left and make it small, my example is 40×35mm, big enough to actually show a picture but small enough to not be cumbersome.

Step Two: 3D Printing

Like for the lithophane Christmas decoration , make sure you print solid. You want:
Good Layer Height: I used 0.2mm in this example for faster printing, I recommend 0.12mm for better quality.
Bottom Layers and infill: set to 999999 and 100%, respectively.
Build plate adhesion: (not shown in the pic) use a brim, you don’t need an huge one if you print along the Y axis. I used 6mm.

Final Step: add a keychain ring

Simple as it is, the print comes with a hole where you can put a keychain ring. Most local and online hardware store will have different sizes in stock, you can find a 50 rings pack for less than 3€/£3/$3.