Categories
3D Printing Nerding

Trolling people with my 3D printer

Little warning: this post is NSFW and offer no useful information.

You know what? I hate always serious people, the ones that never ever have fun. When people ask why do I own a 3D print I usually reply with “to print dicks“, most people think I’m making a bad joke, some raise eyebrows, one Karen straight up insulted me for my immaturity. Most of these people usually follow up with the request “you should print me something!” and get extra offended when I have the arrogance to ask for money, like 2-5€, for material and electricity.

In one particular occasion before last Christmas I started trolling a friend and told him I’m a Custom Sex Toy Designer, I told him I could print a small dick with his name on it. I was so amused with this result and printed a bunch of them for many friends and colleagues.

Everybody loves those!

I rolled with this kind trolling until it got too big to quit and some people asked “so, what kind of custom do you create?” and I really didn’t have an answer. I had to deliver a product, something that looked professional.
Amazon gave me an idea when I saw a good offer for blue glow in the dark PLA, but a glow in the dark penis is nothing more than a regular one.

The real idea came when I heard a colleague talking about how much he loves Napoli’s football team, he wanted a tattoo with the team logo, I had a much better idea: A butt plug with that logo on the flared end.

A couple minutes on Inkscape to draw a realistic profile, some more minutes on OpenSCAD to extrude my design and imprint the logo’s N (found for free on thingiverse), 3 hours of printing and some shitty ad made with my phone and I got my fake product.

Translations: “For real fans only!!!” and “*not for use

Wonderful!

Categories
3D Printing Nerding

Make your own Christmas Lithophane decoration

If you have a 3D printer or have access to a reliable 3D printing service, this guide will help you make very cool Christmas tree ball decoration. The process is easy and the end result is awesome.

I actually wanted to make this post before Christmas 2019, first tests and notes came from late November 2019 but I really could not find the time to wrap up everything. But let’s look at the half full glass: now you have almost one year to prepare for Christmas 2020!

But let’s not write an huge irrelevant intro, like kitchen blogs do, and let’s go ahead.

What will you need for this guide?

  • The image you want to impress. I recommend a 4:1 ratio.
  • This online lithophane generator
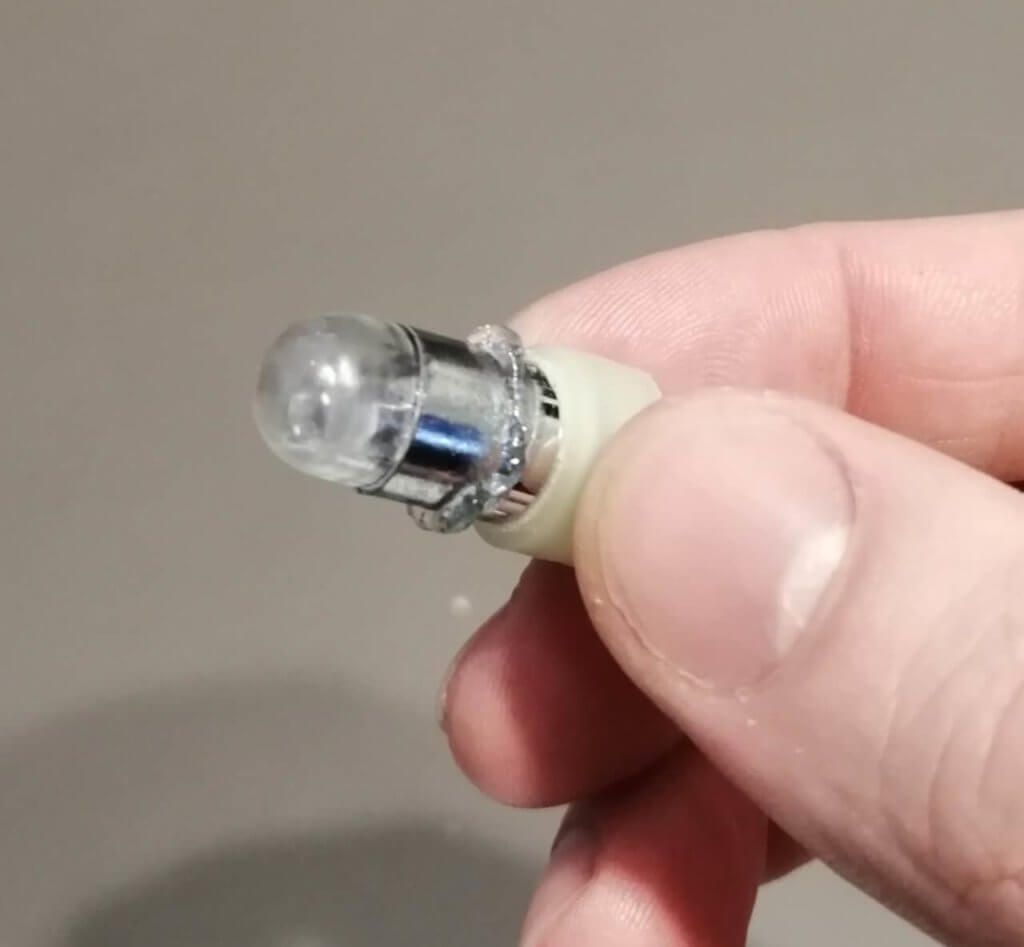
  • Those lights. Link is the exact one I bought from Amazon Italy, but you can find them wherever
  • A bit of thick glue
  • A Christmas ornament hook or a string

That’s it.

First step: The image

Ok, so now we start by preparing an image. I recommended a 4:1 ratio for the image for a full loop around the sphere, the generator will wrap it 360 degrees horizontally and 90 degrees vertically. Since no camera have this weird ratio, I strongly suggest making photo collage, here’s an example using my two good girls: Ariel and Isabel.

Second step: Lithophane sphere generation

Now the next step is generating our lithophane. Head over to the site and start by uploading the image.

Now since an image is worth a thousand words, here’s a screenshot of what settings you will need.

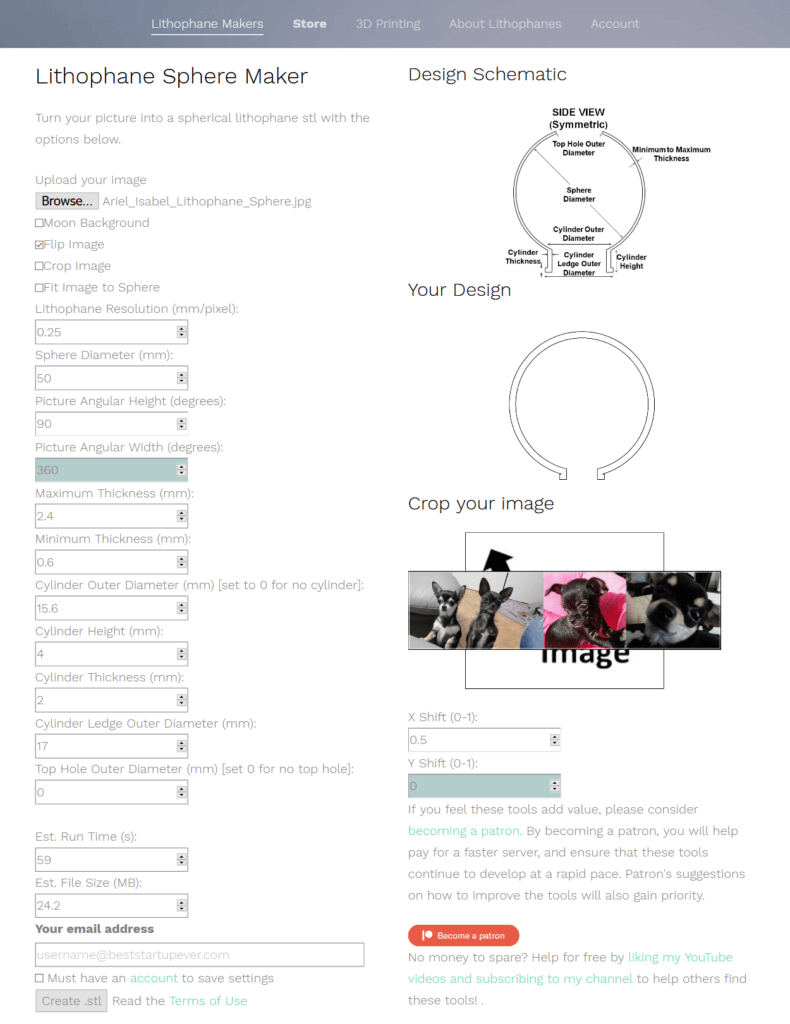
Remember to check Flip Image, as the is made for bedside lamps and we are printing one upside down.
You should copy everything from the screen, only edit Sphere Diameter if you want a bigger one, but I found 50 to 75 mm to have the best result with our tiny lights, and Cylinder Outer Diameter to better fit your printer tolerances. Better explanation: There’s no inner diameter setting, instead it is calculated from Cylinder Outer Diameter minus two times Cylinder Thickness (making it 11.6 inner in this case), the lights are 11-11.2 mm wide, but I left some tolerance to compensate for printing errors and for easier fitting.

After you set up the values, press Create .STL and wait a minute for the download to generate.

Third step: 3D Printing

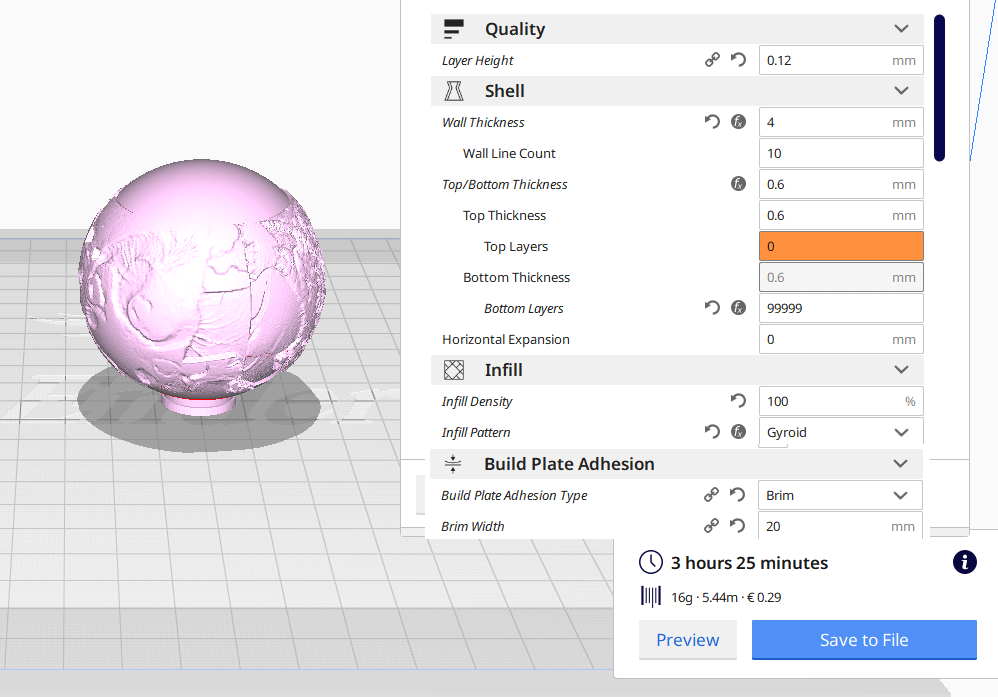
When comes to printing, lithophanes should be printed solid and require some specific settings. Here’s what you have to set in Cura:

  • Layer Height: should be a good quality one, I use 0.12mm. Do not use huge layers for smaller ornaments or the image will be grainy.
  • Bottom Layers: set it to something like 99999
  • Infill: 100%
  • Build plate adhesion: I use a 20mm thick brim for a 50mm sphere, use 30-35 for a 75mm sphere, you don’t want the print to fall down.
  • Print slower. Some people suggest to print super slow, like 15mm/s. I think you should print them at 50-75% of your regular speed (eg. 30 to 45 if you usually print at 60mm/s). The one I show in this guide was printed at 120mm/s on a cheap Ender 3 and still looks ok.

Note: If you use a 3D printing service, make sure you tell them you want a 100% solid item like this, having an infill will blur or mask out parts of the image.

Now slice that file and print it, you should print it using white PLA, other colors may block too much light.

Fourth Step: final touches

Grab one light, put on a ring of glue and place it inside the hole, you can use the silicon ring as stop to let the light sit in position. Store it somewhere where it can’t roll and let it dry overnight.

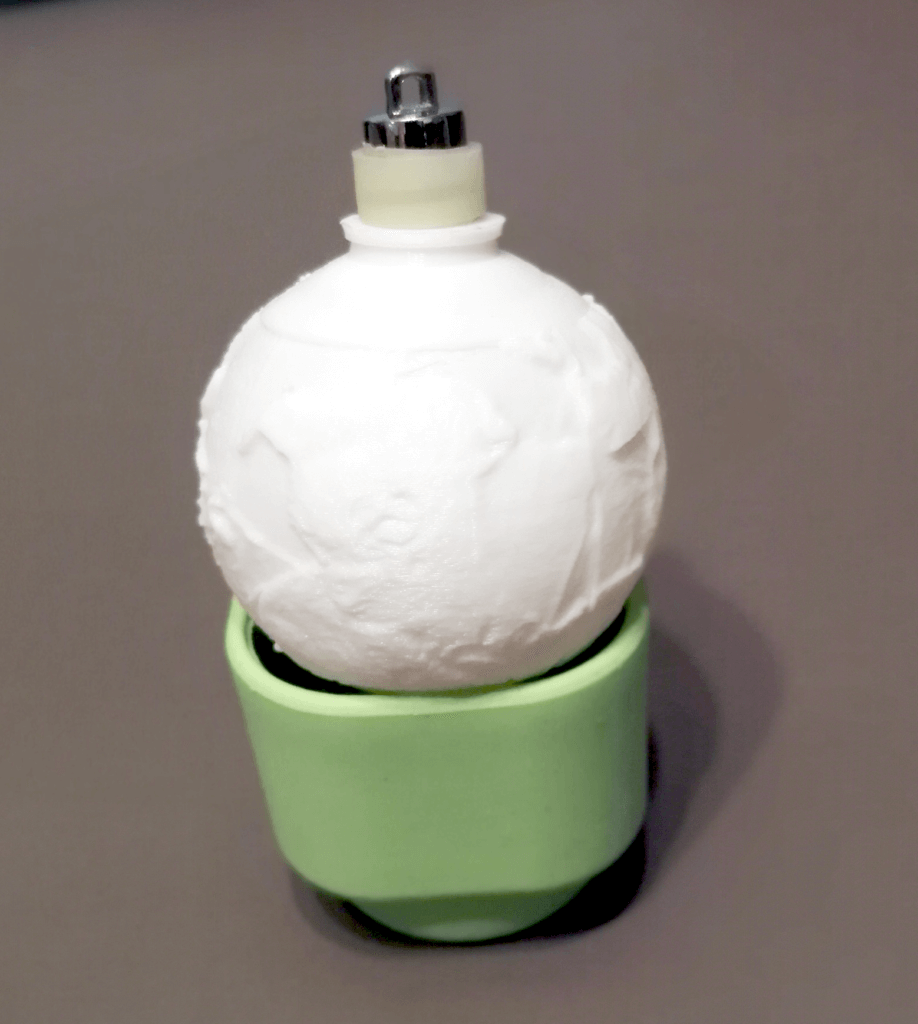
For the last touches add a small ornament hook or a piece of string.
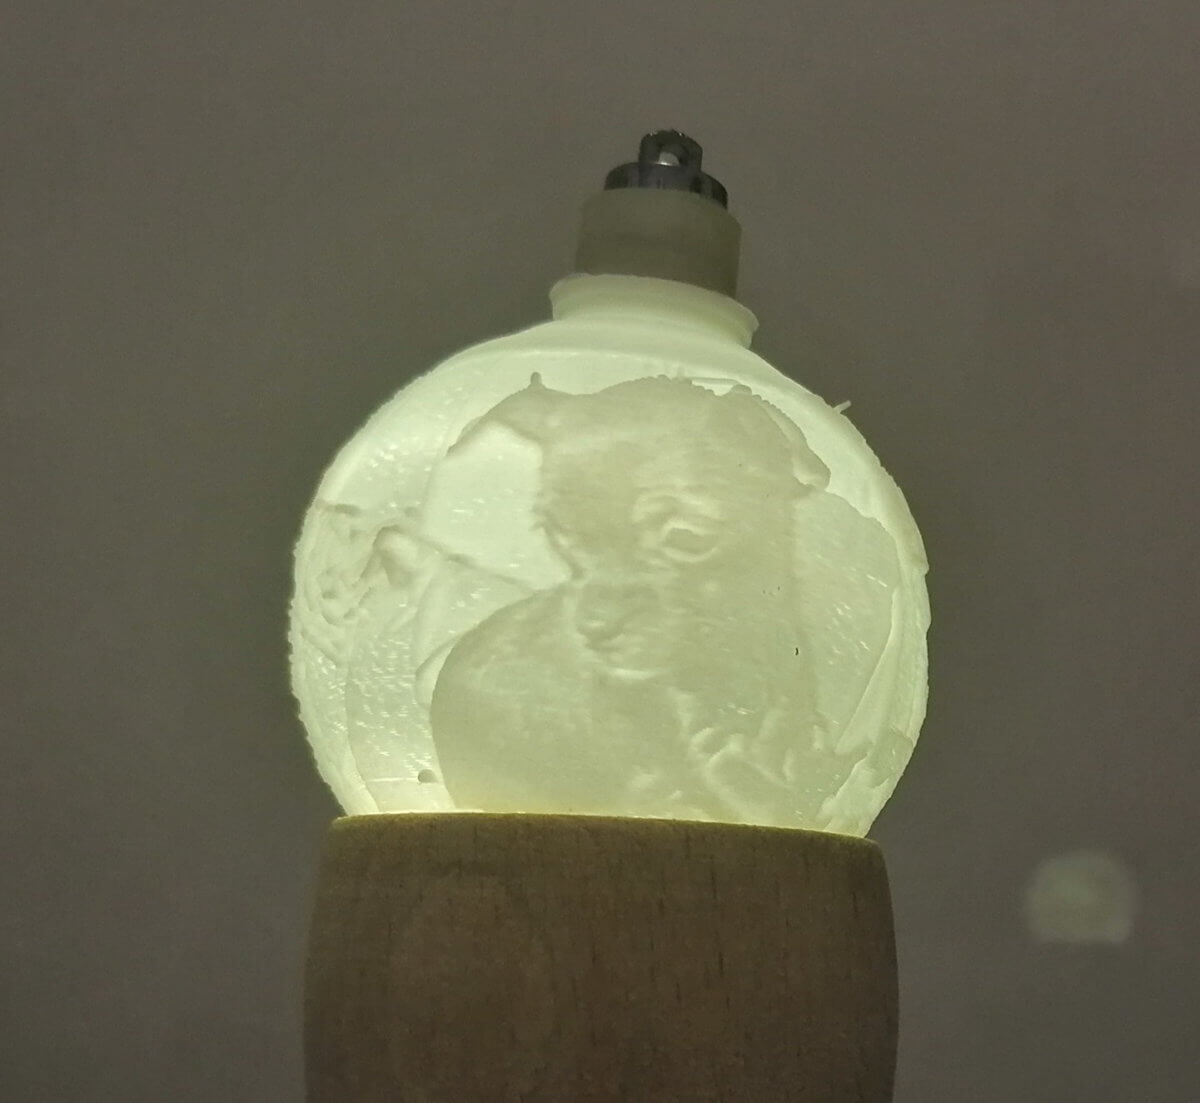
Fifth Step: Done!

Look at that! Now your print is ready to hang. Remember to fully unscrew cap and remove the battery protection, then screw/unscrew to turn it on/off.

Categories
3D Printing Nerding

3D printing and painter’s tape

Whoa! Over one year has passed since my last post.

Last month I got into 3D printing, got myself a Malyan M150, a cheap chinese i3 printer but solid enough for some hobbyist work. It has all the basic features I need plus a metal heated bed.
I’ve already printed multiple items, including a tiny penis keychain ( yes! my fist print was a penis! ), a bunch of wristwatch stands for my growing poor man’s watch collection and a bunch of precision tests: a boring cube, the same tiny boat benchmark everybody prints, a T62 tank printed at double the default speed and 0.3mm layer height and a 1cm tall figurine printed at 0,1mm height and half the speed.

Now, my along the printer came a beautiful plastic scraper I suppose to be used when removing prints. I still haven’t figured out how to correctly use it, so I’m using my old friends The Hammer and The Screwdriver to pop prints from bed, which caused an awful lot of scrapes on the paper sheet covering the bed. Looking for replacements I found out some people use different materials, including paper, glass, PEI, vinyl and glues with varying prices and qualities. Some people thought of using blue painters tape, I admit I never ever heard about BLUE tape in my whole life and I found out nobody in Italy even knows of it. I decide to put a test on light yellow tape usually found here and I bought a 3M/Scotch Tape 2214, 50mmx50m roll, capable of withstanding 60°C of temperature for at least 1 hour without degrading (there was one rated at 100°C, but the shop did not have it in stock).

I immediately put a strip to test, using a ruler to level it evenly, but my prints did not stick to this tape. After some throwaway tries I found out the bed must be heated to 70°C for the first two layers to make PLA stick, after that it can be safely cooled to 50°C. I stress tested this setting with two prints for 9 hours total and the tape still went strong, the two pieces unstuck easily when the bed cooled to room temp and I was still able to remove the tape from the bed leaving no trace behind.

tape