Categories
PC Nerding

Git, Unity3D and Dropbox

Sometimes I think I look a bit obsessed by revision control, but i really find those notes are the only ones worth writing down.
My previous tutorial about Git and Unity3D used a virtual machine for keeping git repos, setting up correctly a VM is hard stuff for some, so i decided to make an easier tutorial on the matter.
Today I will show you how to store a git repository right in your Dropbox folder.

Step 1: Creating a bare remote repository in your Dropbox folder
First, using git bash let’s navigate to our Dropbox folder. This location may vary depending on your configuration.

cd ~/Documents/Dropbox

Once we are here, we’ll make a new folder and create a new bare repo inside it.

mkdir myGitProject
cd myGitproject
git --bare init

Step 2: Setting Unity3D
If you are not using Unity3D or if you followed my previous Git and Unity3D tutorial, you can skip to step 3.
In Unity3D editor, create or load a project, then go to Project-Settings>Editor and under Version Control>Mode select Meta Files. Save your scene/project.

Open your explorer and navigate to your Unity3D project root folder. NOTE: your project root folder is the one which contains Assets, Library and ProjectSettings folders. Create a new file called .gitignore (be sure to include the dot), open it in Notepad or your app choice and paste this block inside it. This file will tell git to ignore those files, since those are not needed when syncing.

#Folders
/Library
/Temp
/Builds

#Project/User Preference Files
*.sln
*.csproj
*.pidb
*.userprefs
*.user
*.suo

#OS Junk
Thumbs.db
.DS_Store*
ehthumbs.db
Icon7

Step 3: Create the local repository
Open your git bash again and navigate to your project folder

~\Documents\Unity\myLocalProject

Then start a new local repo using

git init

Add all the needed files to your git repo using (the unneeded files are automatically discarded by out .gitignore list)

git add -A

And lastly make the first commit

git commit -m “Initial commit”

Step 4: Link your local and remote repo
Keeping the bash open in our local project folder, let’s link the remote dropbox repo by using:

git remote add origin ~/Documents/Dropbox/myGitProject

Now let’s make a push to the remote repo

git push origin master

If you are working alone, you’re done. If you want to sync across different computers keep reading.

Step 5: Cloning and pushing from another pc
Now on your second pc / other dev pc clone the remote repo
NOTE: in the first line i set my working folder to home folder, you should set a folder where you usually store your projects like ~/Documents/Unity or ~/Projects

cd ~
git clone ~/Dropbox/myGitProject myLocalClone

Now play around and modify some stuff and code.
To push back stuff, add them to a local commit and push them like we did earlier.

cd ~/myLocalClone
git commit myscript.cs -m 'modified a file'
git push origin master

Step 6: Pulling
Now on our first pc we can get the changes made on the second one by pulling stuff

cd ~\Documents\Unity\myLocalProject
git pull origin master

Now you are set. Remember to push/pull/merge stuff on all synced computers.

Final Notes
While it will work well with small projects by small teams, I would not recommend using it with big files or more than 2-3 developers. This because the entire git repo is shared over Dropbox and two git pushes at the same time will cause Dropbox to sync those pushes together, messing up your project data.
This is a basic setup, for anything more professional like a real git repo server, issue tracking and wiki functions you should look at BitBucket, which offers free unlimited (private or public) repository hosting for small teams (up to five devs).

FAQ
Q. Can I use other backup services?
A. Google Drive, Asus WebStorage and other similar services should work the same way. Remember to not push stuff from different location at the same time.

Q. Will this tutorial work with non Unity3D projects?
A. I suppose yes, just skip Step 2 and it should work fine.

Q. Most tutorials out there use the command git add . to add files where you used git add -A. Why is that?
A. I prefer using git add -A because it indexes removed files, while git add . doesn’t. A good explanation about those differences is explained in this StackOverflow question. I think most tutorials use git add . because indexing deleted files (with -A) is completely useless before the first commit.

Q. Do you actually use this setup?
A. Sometimes yes, for tiny projects and for projects where I always need a ‘local’ remote repo where there’s no internet connection available.

Q. Is it safe to push/pull to/from repo while Unity3D’s editor is open?
A. No. To avoid errors, you should always push and pull stuff with your editor closed.

Q. OMG! My project lost all the linkages set in the unity inspector!!!!11111ONEONEONE
A. That’s probably because you forgot to enable meta files in your project settings. See Step 2.

Q. Why do you store a repo inside dropbox? It is not better to store my project folder straigth into Dropbox?
A. Dropbox will always try to sync saved files, even those you are still working on. The main difference in my approach is that you can edit all the files you need and commit your modification only when you are sure whether these are working. This will avoid other synced devs to get not working or incomplete files.

Categories
PC Nerding

Unity3D Scene Chase Cam

Chase Cam Screen

A little useless intro:

Today i had this problem: i wanted to visaully see how an AI was playing while I was moving my player object on game screen. The best solution i thought of is using an editor script to make a scene cam follow my AI object. A made a little google search, wich didn’t give me any kind of answer. Then i decided to write this script by myself.

Where this post should really start

Hi all! I just made this neat C# editor script for Unity3D, wich adds a function to “chase” objects whitin your editor’s scene views. It can be used to follow an object while you play, showing in separate windows and/or with a separate angles what is happening around. Or it could be used to let your testers play the game on one monitor, while you look over all your methodically placed debug lines and texts on a second one. Just use your imagination.
It will update ALL your scene views, for example if you want to simultaneously look at an object front, lateral and top views you can create more scene views within your editor and let the script do its magic.

How to use:
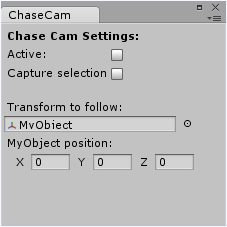
You can open a Chase Cam toolbox by clicking Window>Chase Cam in your editor menu. As you can see in the screen, there are two toggles an object selection box, I think their usage is intuitive. If not, see script’s header for more detailed instructions or just play around with the buttons. Please note the script will not run if the game isn’t running.

The script is release under GNU GPL v2 license Modified BSD License (switched after this discussion on reddit), feel free to modify/improve it and if you want drop a comment here or mail me showing me your modifications I will be happy.

Download link:
Unity3D Scene Chase Cam (4772 downloads )

Categories
PC Nerding

Git and Unity3D

2012/08/11 Update: This post assumes you are able to set up and configure correctly a Virtual Machine. I strongly reccomend to follow my newer tutorial on the subject, Git, Unity3D and Dropbox, which is simpler.

This is not intended to be a tutorial for the masses, but it’s a list of things i did to set up a new Unity3D project and it’s relative Git repository. I made it for myself reading a bunch of other people’s tutorials, i don’t expect others understanding this. It also requires a bit of previous knowledge using linux shell, ssh and git.

Starting off, here are the tools you will need:
-I’m using Windows Vista Ultimate, so consider the first part Windows only.
Unity3D
Git. I suggest installing Git from the official installer wich adds Git commands in your context (=right click) menu.

First, create a new empty folder, in this example i will use:
C:\Users\USER\Documents\Unity\MyNewProject
Where USER is your Windows username. You can use any path you want, just remember where it is located.

Start Unity3D and then make a new project inside the folder we previously created.
Go to Project-Settings>Editor and under Version Control>Mode selects Meta Files.
Save an empty scene or import your assets and then close Unity3D.

Get back to your project folder and add a .gitignore file with this list (obviously stolen from another tutorial linked here, hope the original author doesn’t sue me 🙂 ).

#Folders
/Library
/Temp
/Builds

#Project/User Preference Files
*.sln
*.csproj
*.pidb
*.userprefs
*.user
*.suo

#OS Junk
Thumbs.db
.DS_Store*
ehthumbs.db
Icon7

Right click inside your folder window and select Git Init Here. After that, right click a second time and click Git Bash, this will show you a terminal like window.
Run the command
git add . (NOTE: dot included)
this will add all your files, excluding those defined inside .gitignore, to your repo.
Running
git status
will show you a bunch of files that will be added to the repo.
You can make your first commit running this command
git commit -m “Initial commit”
Running
git status
again will show you that there’s nothing else to commit.
From here, just use it like any other Git repo. I’m pretty new to Git, see git’s official docs to see on how to use it as my advice could be really bad ones 😛 .

Part2: Sharing on LAN
Ok, now that’s your local repository, working like a charm on your machine. But what if you want to make it available for all your computers? The best solution i found was using a lan git server inside a virtual machine. Now you can dowload your favourite linux/server distro and install it on your virtual machine, install git-core, openSSH and a bunch of random packets. But I always prefer the easiest way, and i suggest you to download Revision Control Appliance from TurnKey, wich happens to have git, openSSH and a lot of packets already configured and working out of the box. I personally use it in VMware Fusion on my Mac, but it can be used with VirtualBox or the free VMware Player on your pc, there’s absolutely no difference, just make sure the VM’s network is set to Bridged Mode.

Let’s see the steps we need to get our git server running.
First, download the virtual machine from TurnKey website.
Unzip the content in a folder you like (eg. your Virtual Machines folder) and run the machine.
On first run it will you to set a root password, choose one you like and remember it or write it down.
After that the vm will show you a screen containing the vm’s ip and a bunch of addresses for various services. Once you see this screen you’re done, write the machine’s ip somewhere, you will need it later.
Minimize the vm (without pausing or quitting it, we need the server running).

Now we need to create a bare repo for our project inside the server.
Get back to your main pc and SSH the server (this can be done from your Git Bash or any other SSH programs like putty), in my case the command was
ssh root@192.168.0.16
you will have to use the ip of your virtual machine. It will ask for a password, that’s the one we set on vm’s first run.
Navigate to git repository and make a new folder for our project, cd to it and make a new bare repo. In short:
cd /srv/repos/git/
mkdir mynewproject.git
cd mynewproject.git/
git –bare init

It should tell you Inizialized a new empty Git repo on /srv/repos/git/mynewproject.git/. Remember this line.
Logout from ssh.
From your Git Bash, make sure you’re still in your project folder and add the remote repository using this command (remembering to change ip and project folder):
git remote add origin ssh://root@192.168.0.16/srv/repos/git/mynewproject.git
Now push your local master copy to the server
git push origin master
Will ask for a password, wich is still the same we used for SSH access.

Part3: downloading a clone from your LAN Git Repo
Tested this using both Windows Git and Mac’s GitX
Using Git Bash or OSX’s Terminal, move to a folder you like and send this command:
git clone ssh://root@192.168.0.16/srv/repos/git/mynewproject.git
And you will be done. 😀

I didn’t test this deeply, maybe there are flaws here and there, but it’s a solution that’s works, at least on my machines.